Select Blogs: Indonesian Flag Alcosmic alrevis Alrevis

Friday, October 30, 2009

Create Drop Cap

In MS Word there are facilities that can be used to create large letters at the beginning of the sentence, called Drop Cap. So what if we want to implement something similar to the post on the blog? Of course it can be done by adding some CSS style on the Edit HTML page.

Following steps below:
1. Go to Layout menu and select Edit HTML.
2. Enter the following CSS script before the tag ]]></b:skin>:

.dropcaps {
float:left;
font-size:100px;
line-height:80px;
padding-top:1px;
padding-right:5px;
}

3. Then click SAVE TEMPLATE!
5. If you want to put it on a post, then at the beginning you have to type:

<span class="dropcaps">Your text</span>

For Example:

<span class="dropcaps">L</span>

6. If you're already published, will look like this:

Lorem ipsum dolor sit amet, consectetuer adipiscing elit. Quisque sed felis. Aliquam sit amet felis. Mauris semper, velit semper laoreet dictum, quam diam dictum urna, nec placerat elit nisl in quam. Etiam augue pede, molestie eget, rhoncus at, convallis ut, eros. Aliquam pharetra. Nulla in tellus eget odio sagittis blandit. Maecenas at nisl.

Good luck :)

Wednesday, October 28, 2009

How to Host JavaScript on Blogger with Unlimited Bandwidth

You are bored with free hosting such as geocities, ripway, mydatanest, and other free hosting because they have a limited bandwidth? Then why you don't host your files directly in Blogger, especialy file type like javascript!

Normally to use javascript in blogger you must use tags like this <script src="Your File Location" type="text/javascript"></script> which means your files are hosted by using third-party services that have limit in bandwidth :( Since there was a problem like that then I am going to explain you how to host the javascript file directly in blogger with Unlimited Bandwidth!

Here are the steps:
1. Copy the entire script in your javascript file and paste in a text editor program, such as WordPad or Notepad.
2. Make a tag like this on your blog template if you want to host the javascript file, where is this tag will paste is depend in your needs!

<script type='text/javascript'>

//<![CDATA[

PASTE YOUR JAVASCRIPT CODE HERE

//]]>

</script>

Copy the javascript code before that you have saved as a text editor program and then paste in the text PASTE YOUR JAVASCRIPT CODE HERE!

3. Save!

Congratulations you have successfully host your javascript file in your own blog!

For example you can see its use in my previous post about how to display related articles, You can understand it by yourself :)

Benefits of this trick:
» No file size limitations
» No bandwith limitations
» Super fast page loading (coz files are stored in blogger itself)

Like the trick ? comment.. :)

Monday, October 26, 2009

Make Recent Posts and Recent Comments Widget

Recent Posts and Recent Comments Widget seem to be one of the most common widget used by the bloggers at the moment :) Recent posts used to display the latest post adjustable own number, and recents comments widget is used to display the latest comments from visitors.

Here are the steps to make them:
1. SIGN IN to Blogger.com.
2. After you enter the Dashboard page click on the Layout link.
3. Select Page Elements, Then click Add a gadget.
4. Next you select HTML / Java Script.
5. In the dialog box HTML / Java Script add code below to make a recent posts widget:

<script style="text/javascript" src="http://www.mydatanest.com/files/remba03/18732_qte7y/recentpostsalrevis.txt"></script><script style="text/javascript">var numposts = 5;var showpostdate = true;var showpostsummary = true;var numchars = 100;var standardstyling = true;</script><script src="http://yourblogURL.blogspot.com/feeds/posts/default?orderby=published&alt=json-in-script&callback=showrecentposts"></script>

In Title option you can give the title Recent Posts (optional).
6. Click save. Set the position of the gadget, then save. Try to access your blog to see the results.
7. To create a recent comments widget it was same as create recent posts widget, after the dialog box Add a Gadget appears select category HTML / Java Script!
8. After the dialog box appear HTML / Java Script copy and paste script below to create a recent comments widget!

<script style="text/javascript" src="http://www.mydatanest.com/files/remba03/18734_7xaha/recentcommentsalrevis.txt"></script><script style="text/javascript">var numcomments = 5;var showcommentdate = true;var showposttitle = true;var numchars = 100;var standardstyling = true;</script><script src="http://yourblogURL.blogspot.com/feeds/comments/default?alt=json-in-script&callback=showrecentcomments"></script>

9. Click Save!
10. Access your blog to see it :)

Note: figure 5 shows in red are the number of posts / comments are displayed. You can change the way you want!

Saturday, October 24, 2009

Add "Loading Icon" Before Images Appear

Let's say you have a large picture in your blog, and you want when the image was in load a preload icon appears which shows that the images was in load, for this trick you can use a little trick of css :)

You can only use java script for this trick but if you use java script tricks then your blog will be heavier to open. Okay, the choice is yours, to use java script trick or css trick? But in this post I will explain the css tricks only :D

Here are the steps:
Step 1: Prepare a preload images!
Prepare a preload images like this , to preload images you can make an online here. But remember not to make the image size too big because if too much preload images may not appear when the main image is in load! You do not want that to happen right!?

Step 2: Input to the template CSS!
Go to the tab Edit HTML and look for the code ]]></b:skin> and input the code below before the code ]]></b:skin>!

.load{background:url(images/youricon.gif) no-repeat center;}

Do not forget to replace the red colored text with your preload images address!

Step 3: How to use the code.
The easiest way to use this trick is to add a div tag on every image in your blog, and also write down the length and width of the image that is loaded, for example like this:

<div class="load" style="width:200px;height:200px">
<img src="http://www.dynamixlabs.com/images/largeimage.bmp" alt="alternate text" /></div>

For example after the code added to images, like this:
You must clear the cache and reload this page first! Or you can see it here :D

load image


Note:
This trick can be used in browsers Internet Explorer 5.5, 6, 7, Firefox (PC and Mac), Netscape and Safari (PC and Mac).

Wednesday, October 21, 2009

Related Posts Widget for Blogger

The advantage of installing the widget Related Posts or so-called "related articles" or "article in the same category as" is allow readers can easily find the articles that are related to the article they are reading without going and open one by one page in the link label. Examples like the one on this blog, at each end of the article there are links of related articles based on the category or the same label. Just for make you understand see a screenshot below:
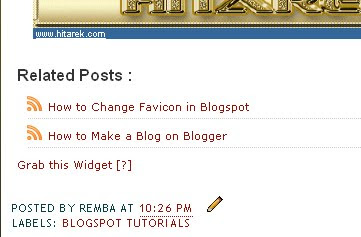

Okay did not have much to say again, go directly to the manufacturing process :D

Here are the steps:
1. From your Blogger Dashboard Open Layout > Edit HTML.
2. Back up your template before making any changes!
3. Make sure you check the box "Expand Template Widget".
4. Search tags </head>.
5. Add the following code just before the tag </head>.

<style>
#related-posts {
float : left;
width : 540px;
margin-top:20px;
margin-left : 5px;
margin-bottom:20px;
font : 11px Verdana;
margin-bottom:10px;
}
#related-posts .widget {
list-style-type : none;
margin : 5px 0 5px 0;
padding : 0;
}
#related-posts .widget h2, #related-posts h2 {
font-size : 20px;
font-weight : normal;
margin : 5px 7px 0;
padding : 0 0 5px;
}
#related-posts a {
text-decoration : none;
}
#related-posts a:hover {
text-decoration : none;
}
#related-posts ul {
border : medium none;
margin : 10px;
padding : 0;
}
#related-posts ul li {
display : block;
background : url("https://blogger.googleusercontent.com/img/b/R29vZ2xl/AVvXsEgJ9ATioUCrfcKgrDGvXHQ89H_jVHmVDj80O1_hnrXGyi0ZDGHvb5-F-PquQCJn8YBqPYEYP3VZ8uFAoGMJvg7ZkOqW29zUMJq76WoIWTpr8HG2NZayVOgwsWtw_Fu331vUkAHwlgDY9h0/") no-repeat 0 0;
margin : 0;
padding-top : 0;
padding-right : 0;
padding-bottom : 1px;
padding-left : 21px;
margin-bottom : 5px;
line-height : 2em;
border-bottom:1px dotted #cccccc;
}
</style>
<script type='text/javascript'>

//<![CDATA[
var relatedTitles = new Array();
var relatedTitlesNum = 0;
var relatedUrls = new Array();
function related_results_labels(json) {
for (var i = 0; i < json.feed.entry.length; i++) {
var entry = json.feed.entry[i];
relatedTitles[relatedTitlesNum] = entry.title.$t;
for (var k = 0; k < entry.link.length; k++) {
if (entry.link[k].rel == 'alternate') {
relatedUrls[relatedTitlesNum] = entry.link[k].href;
relatedTitlesNum++;
break;
}
}
}
}
function removeRelatedDuplicates() {
var tmp = new Array(0);
var tmp2 = new Array(0);
for(var i = 0; i < relatedUrls.length; i++) {
if(!contains(tmp, relatedUrls[i])) {
tmp.length += 1;
tmp[tmp.length - 1] = relatedUrls[i];
tmp2.length += 1;
tmp2[tmp2.length - 1] = relatedTitles[i];
}
}
relatedTitles = tmp2;
relatedUrls = tmp;
}
function contains(a, e) {
for(var j = 0; j < a.length; j++) if (a[j]==e) return true;
return false;
}
function printRelatedLabels() {
var r = Math.floor((relatedTitles.length - 1) * Math.random());
var i = 0;
document.write('<ul>');
while (i < relatedTitles.length && i < 20) {
document.write('<li><a href="' + relatedUrls[r] + '">' + relatedTitles[r] + '</a></li>');
if (r < relatedTitles.length - 1) {
r++;
} else {
r = 0;
}
i++;
}
document.write('</ul>');
document.write('<a rel="dofollow" href="http://alrevis.blogspot.com/2009/10/related-posts-widget-for-blogger.html">Grab this Widget [?]</a></font>');
}
//]]>

</script>

6. Now look for the code <p><data:post.body/></p>. Some templates the code may like this <div class='post-body>.

7. Copy the code below and place under the code <p><data:post.body/></p>!

<b:if cond='data:blog.pageType == "item"'>
<div id="related-posts">
<font face='Arial' size='3'><b>Related Posts : </b></font><font color='#FFFFFF'><b:loop values='data:post.labels' var='label'><data:label.name/><b:if cond='data:label.isLast != &quot;true&quot;'>,</b:if><b:if cond='data:blog.pageType == &quot;item&quot;'>
<script expr:src='&quot;/feeds/posts/default/-/&quot; + data:label.name + &quot;?alt=json-in-script&amp;callback=related_results_labels&amp;max-results=5&quot;' type='text/javascript'/></b:if></b:loop> </font>
<script type='text/javascript'> removeRelatedDuplicates(); printRelatedLabels();
</script>
</div></b:if>

8. Save and see the results:)

Customize
To change the number of posts a link that will be displayed and you can change the number 5 in the code max-results = 5 (code in step 7). Change the number 5 with the number of posts a link you want to show!